
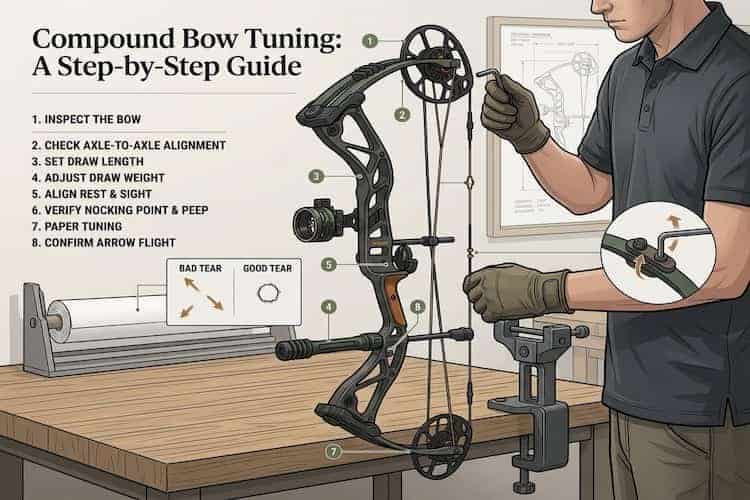
Safety, Inspection, and Required Tools
Before you touch any limb bolts, check your compound bow for cracks, frayed strings, or worn serving. A bow square, bow scale, and bow press cover most tuning jobs at home, but some repairs really need a pro shop.
Start every session with a five-minute inspection. Look over the bowstring and cables for fuzzing, stretched strands, or separated center serving.
Check the cams for cracks or chips, especially around the axle holes and cable tracks. Run your fingers along both limbs and look for splinters or hairline cracks.
If you spot any limb damage, stop right there. Don’t draw the bow.
Also check that your limb bolts are seated evenly. Make sure no bolt is backed out past the manufacturer’s minimum turns.
Backing out too far can let a limb slip out of the pocket under load.
Essential Home Tuning Tools
You don’t need a huge toolbox for most tuning. Here are the basics worth having on your bench:
| Tool | What you use it for |
|---|---|
| Bow press | Relaxing limbs to swap strings, shim cams, or adjust yokes |
| Bow vise | Holding the bow steady and level while you work |
| Bow square | Setting nock height and measuring brace height |
| Bow scale | Checking actual draw weight after turning limb bolts |
| Draw board | Measuring draw length and checking cam timing at full draw |
| Allen wrench set | Adjusting rests, sights, and limb bolts |
| D-loop pliers | Tightening D-loops without chewing up the serving |
| Grain scale | Weighing arrows, points, and broadheads for consistency |
| Arrow squaring tool | Squaring shaft ends so broadheads mount straight |
A press like the Last Chance EZ Green is my first choice. Other presses such as the MFASPORT Compound Bow Press run a little less and fit in your budget and house.
Buy the press that fits your bow. Some past-parallel and short-axle bows need special fingers or adapters.
When a Bow Shop Should Handle the Work
Some fixes are risky or need tools you probably don’t have. Take your bow to a shop for these:
- Limb or cam replacement after any crack or chip appears
- Cam lean correction that needs spacer shims or yoke tuning on bows without adjustable yokes
- Cam timing and cam synchronization issues that won’t go away after a draw board check
- String and cable replacement if your press isn’t rated for your bow
- Brace height outside spec, which usually means stretched strings or a timing problem
Shops have a chronograph, draw board, and press already dialed in. That can save you a lot of time and frustration.
If your bow makes a weird noise, shoots slower, or the cams don’t rotate evenly, have it checked before your next hunt.
Build a Reliable Starting Setup
Good tuning starts with a bow that fits you and a rest in the right spot. Before shooting any arrows through paper, lock in your draw length, draw weight, D-loop, nocking point, and center shot.
Set Comfortable Draw Length and Draw Weight
Draw length comes first because it shapes everything else. At full draw, your bow arm should be relaxed with a slight bend at the elbow.
Your release hand should touch the same anchor point every time. If you have to stretch or crane your neck to see through the peep sight, your draw length is probably too long.
That kind of fit forces bad shooting form. No amount of tuning will fix it.
Draw weight should let you pull straight back with control. You shouldn’t have to lift the bow toward the sky.
Try this: draw and hold for 30 seconds while seated. If you can’t do that smoothly, back the limb bolts out a turn or two.
Most compound cams adjust in half-inch steps. Some require a bow press or a module swap, so check your manual before turning screws.
Establish the D-Loop and Nocking Reference
The D-loop gives your release a clean spot to bite and keeps your fingers off the string. Tie it with quality loop material, burn both ends into balls, and pull the knots tight by drawing the bow a few times.
Set your nock point before tying the loop. Many shooters tie in serving knots above and below the arrow nock, using the same nocks they plan to hunt or compete with.
Lighted nocks can be a bit wider, so use what you’ll actually shoot. Nock height starting points:
| Rest Type | Suggested Nock Height |
|---|---|
| Drop-away | Level to 1/8″ nock high |
| Full-capture | Level to 1/16″ nock high |
Use an arrow level to check the shaft. Keep the loop small enough that your release sits close to your face, but not so tight it pinches the nock.
Set Initial Rest Position and Center Shot
Put the bow in a vise and level it before touching the rest. Mount the rest through the Berger hole in the riser.
Adjust height so a nocked arrow passes through the middle of that hole. For horizontal center shot, start between 13/16″ and 7/8″ from the riser face to the center of the arrow shaft.
Check your bow’s manual, since specs vary. A laser center shot tool or just sighting down the string both work for rest alignment.
Sight down the string from behind and see if it splits the arrow and the cams evenly. Add your stabilizernow so the bow balances the way it will when you shoot.
Snug every screw. Draw a few times and re-check that your drop-away cord lifts the launcher fully before the arrow leaves the rest.
Match Arrows to the Bow
No amount of rest adjustment will fix arrows that are too stiff, too weak, or mismatched in weight. Before you shoot any test groups, confirm your spine, length, point weight, and shaft consistency.
Choose the Correct Arrow Spine
Arrow spine measures how much a shaft bends. Manufacturers list it as a number like 340, 400, or 500—a lower number means a stiffer shaft.
Your spine choice depends mostly on draw weight and arrow length. A 70-pound bow drawing 29 inches usually needs a 340 spine with a 100-grain point.
Drop to 50 pounds and a 500 spine often fits better. Check the manufacturer’s spine chart for your exact shaft brand, since charts do vary.
If a shaft is too weak, you’ll often see a stiff tear or left impact for a right-handed shooter after tuning. Too stiff, and you may never get a clean paper tear no matter how much you move the rest.
Account for Shaft Length, Point Weight, and FOC
Spine isn’t set in stone. Three things change how a shaft flexes in flight:
| Change | Effect on Dynamic Spine |
|---|---|
| Cut shaft 1 inch shorter | Acts stiffer |
| Add 25 grains to the point | Acts weaker |
| Increase draw weight | Acts weaker |
Point weight also sets your FOC, or front-of-center balance. Most compound hunters land between 10% and 15% FOC, which helps arrows steer and recover quickly after the shot.
Total arrow weight matters too. Heavier arrows carry more kinetic energy at the target but drop faster.
Most hunters use 400 to 500 grains total for deer-sized game. If you change point weight from 100 to 125 grains, retune—your paper tear and sight marks will both shift.
Use Consistent Arrows for Every Test
Tuning only works if your arrows are identical. Number each shaft and check them before you start.
Make sure these match across your test set:
- Same spine and shaft model
- Same cut length, measured from throat of nock to end of shaft
- Same field points and total weight, within 2 grains
- Same nocks and fletching style, squared and seated the same way
Use fletched arrows for paper tuning and sight work. Save the bare shaft for spine checks, since an unfletched arrow shows steering errors more clearly.
Test broadheads last. Shoot broadhead groups at 20 and 40 yards and compare them to your field point groups.
If they separate, your arrow and bow aren’t fully matched yet.
Diagnose Arrow Flight With Paper
Paper tuning shows you what your arrow is doing right after it leaves the bow. A clean round hole means the shaft flies straight.
Tears to the side or up and down point to problems with your rest, nocking point, or shooting form.
Set Up and Shoot a Consistent Paper Test
Hang a sheet of paper in a frame so it stays tight and doesn’t sag. Put a target about 3 to 6 feet behind it so the arrow passes all the way through the paper before it hits.
Stand about 6 to 8 feet from the paper. Use a fletched arrow with a field point, not a broadhead.
Grip the bow the same way you always do. Even a little hand torque can change the tear.
Shoot three arrows before you adjust anything. If all three tear the same way, the bow is the cause.
If they scatter, work on your release and anchor first.
Interpret Bullet Holes and Horizontal Tears
Start by finding the round hole. That’s where the point punched through. The slits nearby? That’s your vanes.
A bullet hole means both point and vanes went through one spot. Nothing to fix here.
If you see side-to-side tears, your arrow’s fishtailing. Here’s what to do for a compound bow:
| Tear | What It Means | Fix |
|---|---|---|
| Left tear (tail left) | Nock end kicked left | Move the arrow rest right in small steps |
| Right tear (tail right) | Nock end kicked right | Move the arrow rest left in small steps |
Shift the rest about 1/32 inch, then shoot again. If you run out of adjustment and the tear doesn’t go away, your arrow spine might be wrong for your setup.
Check your center shot with a bow square before chasing the tear any further.
Address Nock-High and Nock-Low Tears
Up-and-down tears mean the arrow is porpoising. That’s usually rest height or nocking point.
- Nock-high tear (vanes above the hole): raise the rest a bit or move your D-loop down.
- Nock-low tear (vanes below the hole): lower the rest a touch or move your D-loop up.
Change one thing at a time—about 1/32 inch—then shoot three more arrows.
If you see a small nock-high tear (1/4 inch or less), that’s often fine on a compound bow. It won’t hurt hunting accuracy.
Before you keep chasing tiny tears, check your rest arm timing and make sure your release hand isn’t pulling down during the shot.
Refine the Setup at Distance
A bow that tears clean paper at eight feet might still drift at 50 yards. Checking for fletching contact, double-checking sight and rest alignment at two distances, and comparing bare shafts to fletched arrows can reveal what close-range tuning missed.
Check Fletching Contact and Drop-Away Timing
Fletching contact happens when a vane clips the rest or cable as it leaves the bow. You’ll see weird tears, random fliers, or chewed-up vanes.
Try using powder—spray foot powder or dry shampoo on the back half of the shaft and vanes. Shoot one arrow, then check for wipe marks.
If you spot contact, check your drop-away rest timing. The launcher arm should stay up until the arrow’s almost gone, then drop. Most rests time off the down-cable; shorten the cord for a later drop.
You can also rotate the nock a few degrees. Sometimes, that’s all it takes to clear the vane.
Confirm Alignment With Walk-Back Tuning
Walk-back tuning (or French tuning) separates sight windage errors from rest errors. Paper tuning and bare shafts can’t do this alone.
Hang a plumb string or draw a vertical line on your target. Use a real bow level to make sure it’s straight.
- Shoot close (6–12 feet) with your longest pin. Fix any left/right miss with sight windage only.
- Walk back to the matching yardage, usually 40 to 60 yards. Use the same pin and aim point.
- Fix the far miss with the arrow rest, moving center shot in 1/32″ steps.
- Re-check the close shot, then repeat. Two or three rounds is pretty normal.
If you run out of rest adjustment, cam lean is probably the real culprit. That’s a job for a press and some yoke work.
Use Bare-Shaft Results to Verify the Tune
A bare shaft is just an arrow with no vanes. It’ll really show any launch error.
Shoot three fletched arrows and one bare shaft at the same spot from 15 to 20 yards.
| Bare shaft lands | Likely cause |
|---|---|
| Left of the group (right-handed) | Arrow is weak, or rest needs to move left |
| Right of the group | Arrow is stiff, or rest needs to move right |
| High or low | Nock height or cam timing is off |
| With the group | Tune is confirmed |
Move the rest in tiny steps toward where the bare shaft hits. If vertical misses stay after nock tweaks, check cam sync with a draw board.
Stop adjusting when the bare shaft groups with the fletched arrows at your distance.
Confirm Broadhead Accuracy and Maintain Results
Broadhead tuning is your last check before hunting. Shoot field points and broadheads at the same target, see where they land, then fix any gap with small adjustments.
Compare Broadhead and Field-Point Impact
Start at 20 yards with a foam target and a 2-inch dot. Shoot one field point, then one broadhead, and note the difference.
If both hit the dot, move back to 30, then 40, then 50 yards. Past 50, switch to a 3- or 4-inch dot.
Sixty yards makes a good final test. Broadheads that group with your field points at that distance usually hold together farther out.
Mechanical heads often fly close to field points from a well-tuned bow. Fixed blades? They’re usually 2 to 3 inches off, often right and low.
If your broadheads group tight but off-center, just move your sight until they hit the middle. Then shoot groups to confirm.
Troubleshoot Persistent Tuning Problems
If broadheads won’t group, or group at one distance but scatter at another, you’ve got a tune issue—not a sight issue.
Move your arrow rest, not your sight. If broadheads hit right, move the rest left. If they hit low, move the rest up a bit.
Go slow. Micro-adjustable rests move tiny amounts, and a little change can make a big difference at 50 yards. Shoot several arrows after each move.
If rest tweaks don’t cut it, dig deeper:
| Symptom | Likely Cause | Fix |
|---|---|---|
| Broadheads never settle down | Wrong arrow spine for your draw weight and draw length | Try a stiffer or weaker shaft |
| Groups shift left or right at long range | Cam lean | Yoke tuning (if your bow has split yokes) |
| Random flyers | Shooting form, grip torque, or a bent broadhead | Check form, spin-test each head |
Recheck paper tuning with a broadhead after these fixes to see if you’re good.
Record Changes and Recheck Before Hunting
Write down your settings when the groups line up. A note in your phone or bow case works fine.
Track things like:
- Rest windage and elevation position
- Nock point height
- Sight tape or yardage marks
- Draw weight and arrow weight
- Broadhead model and grain
Recheck your groups a week before season, and after any travel, hard fall, or string change. One or two arrows at 20 and 40 yards will show if the tune held.
Practice with the same broadhead model you hunt with. Buy an extra pack for tuning—practice heads don’t always fly like the real thing.
Frequently Asked Questions
Tuning follows a set order: check the string and cam timing, set centershot near the Berger hole, level the nock point, then shoot through paper and confirm with bare shafts or broadheads. Here are some answers about timing, warning signs, tools, and shop pricing.
How do you properly tune a compound bow?
Start with the basics before you touch the rest. Check your string and cables for fraying or serving separation. Make sure your draw length and draw weight fit your body and shooting style.
Set your centershot next. Most bows do well with the arrow about 13/16 inch from the riser, but check your manufacturer’s spec.
Set nock height so the arrow sits square—or just a touch above square—to the string. Use a bow square for this.
Shoot through paper at about 6 feet. Adjust the rest in small steps—about 1/32 inch—until you get a clean hole with three even fletching tears.
Finish with walk-back tuning at 20, 30, and 40 yards to be sure your rest is centered. If you hunt, shoot broadheads last and compare them to field points at 30 yards.
How can you tell if a compound bow is out of tune?
Watch your arrow flight and your groups. Loud shots, extra hand shock, or arrows that wobble in flight all point to a tuning issue.
- Broadheads hit away from field points at the same distance
- Groups spread out as you move farther back, even with good form
- Fletching contact marks on your rest or riser
- Arrows drift left or right in a pattern as distance grows
- Loud slap or vibration at the shot that wasn’t there before
- Uneven cam stops hitting the string at different times
Cam timing problems are sneaky. Have someone watch as you draw, or use a draw board to see if both cams stop at the same time.
How often should a compound bow be tuned?
Check your bow at the start of every season, and again if you shoot a lot. A quick paper tune takes just a few minutes and tells you where you stand.
New strings and cables need extra attention. They stretch and settle over the first few hundred shots, which can shift your peep, nock point, and cam timing.
Re-tune after:
- Dropping the bow or hitting it hard
- Changing arrows, points, or fletching
- Adjusting draw weight or draw length
- Installing a new rest, string, or cables
- Big swings in temperature or humidity
Most bows need new strings every two to three years with regular use. Plan on a full tune after you swap them out.
What does paper tuning reveal about arrow flight?
Paper tuning gives you a peek at how your arrow behaves right as it leaves the bow. The tear pattern basically points out which way the shaft’s kicking.
| Tear direction | What it means | Common fix |
|---|---|---|
| Clean round hole | Arrow is flying straight | No change needed |
| Tail high | Nock point too high | Lower nock or raise rest |
| Tail low | Nock point too low | Raise nock or lower rest |
| Tail left (right-handed) | Rest too far right, or arrow too stiff | Move rest left in small steps |
| Tail right (right-handed) | Rest too far left, or arrow too weak | Move rest right in small steps |
Paper tuning isn’t perfect. Your own form, how you grip, or if you punch the trigger can mess with the tear and make it look like a bow problem when it’s not.
Shoot a few arrows—three or four—through the paper and see if the tears look the same each time. If every shot tears differently, it’s probably time to work on your release before fiddling with the rest.
What tools are needed to tune a compound bow?
You can get a lot done at home with just a handful of tools:
- Allen wrench set (metric and standard)
- Bow square for nock height
- Tape measure or ruler for centershot
- Paper tuning frame or just a cardboard box with paper taped over a hole
- Nock pliers or a nock set tool
- Bare shafts for checking things
- Level for setting sight and making sure your bow sits plumb
Some stuff really needs a bow press. Swapping cables and strings, adding a peep, or messing with cam timing by twisting cables all fall into that category.
A draw board’s handy if you want to check timing on your own. It holds your bow at full draw so you can eyeball the cams and measure draw length without actually shooting.
How much does it cost to have a compound bow professionally tuned?
Prices jump around depending on the shop and where you live. A basic tune-up usually runs between $25 and $60.
This covers paper tuning, adjusting the rest and nock, and checking timing. It’s not a long list, but it’s important stuff.
A full setup on a new bow tends to cost $50 to $100. That usually means installing the rest, sight, and peep, plus setting draw length and tuning everything up.
If you need new strings or cables, expect the bill to climb. Most shops charge $80 to $200, depending on which brand you pick and whether labor’s included.
Some shops offer a labor discount if you bought the bow from them. It never hurts to ask before you pay the sticker price.
Related content:
- Compound Bow Tuning: A Step-by-Step Guide
- Best Bow Hunting Binoculars
- EosVision 1400-3000 Yard HD Laser Rangefinder for Bow Hunting
- Best Bow Hunting Stabilizers For Accuracy And Less Vibration
- Best Tree Stands for Bowhunting and Easy Climbing
Recent Posts
Crossbow hunting has been gaining popularity in recent years, and for good reason. Crossbows offer a unique hunting experience that is both challenging and rewarding. One essential component of...
Bowfishing in Florida is quickly becoming a popular outdoor activity for both locals and tourists alike. With its vast freshwater bodies, Florida offers a unique and exciting opportunity for...